
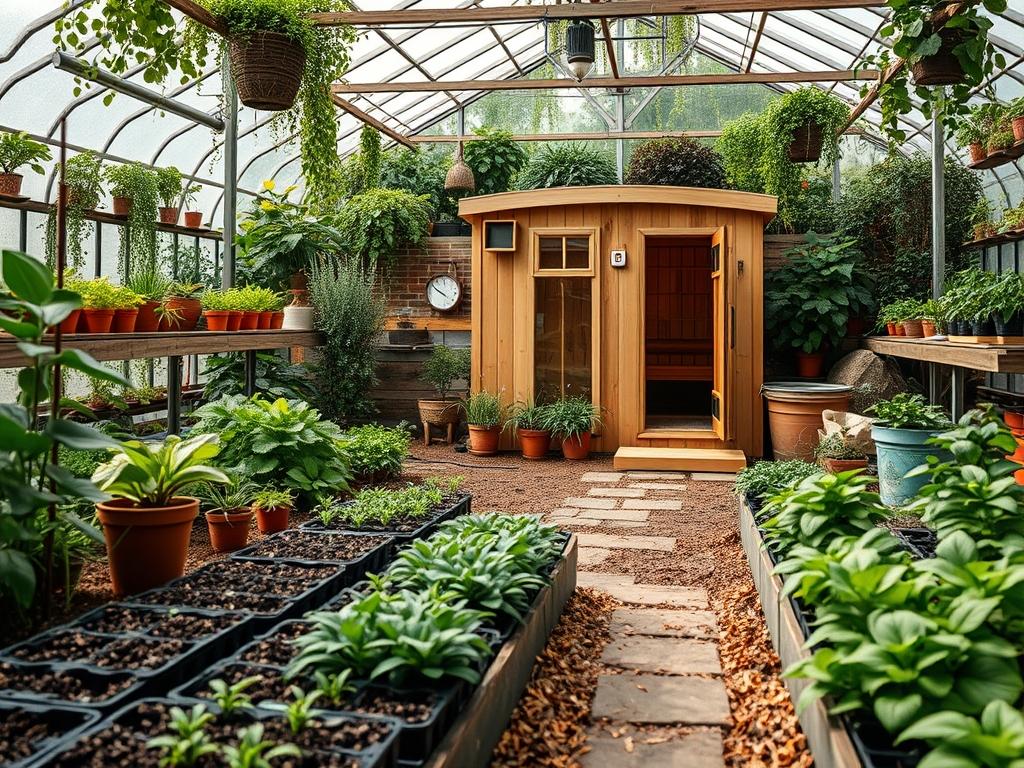
Integrating a high end thermal structure into a residential landscape requires more than just a level surface and an electrical hookup. Professional designers view Outdoor Wellness Saunas as architectural anchors that must harmonize with existing topography, vegetation, and local weather patterns. The primary challenge lies in balancing the heavy, often wooden aesthetic of the sauna with the fluid, organic lines of a functional garden. If the placement is handled poorly, the structure can look like an afterthought or, worse, a bulky shed that disrupts the natural flow of the yard. When executed with precision, however, the sauna becomes the centerpiece of a private sanctuary that increases property value and provides year round utility. Successful integration demands a deep understanding of site grading to manage runoff, the use of durable hardscaping materials that can withstand thermal expansion, and a planting palette that offers privacy without encroaching on the structural integrity of the unit.
Achieving a cohesive look involves prioritizing the user experience from the moment they step out of the house. You must consider the transition from the indoor environment to the outdoor heat. This path should be intentional, dry, and safe, especially in colder climates where ice and slip hazards are prevalent. From a consultant’s perspective, the sauna serves as a destination. We use the concept of “room creation” to define the space around the sauna, utilizing retaining walls or varied elevation levels to separate the wellness zone from the more active or social areas of the garden. By treating the sauna as a focal point, we can orient walkways and sightlines to draw the eye toward the structure, while using softscaping to tuck it into the landscape for a sense of secluded tranquility.
Landscape Design Principles
Symmetry and visual balance are the foundations of a successful wellness retreat. Because Outdoor Wellness Saunas typically possess strong geometric lines, the surrounding landscape should either echo these lines through formal hedging and rectangular paving stones or contrast them with soft, billowing ornamental grasses. A common technique is to use “echoing,” where the wood grain of the sauna is repeated in nearby pressure-treated timber decking or privacy fences. This creates a unified color palette that prevents the structure from appearing isolated. Elevation also plays a critical role. Placing the sauna on a slightly raised platform, such as a 6-inch gravel pad or a reinforced concrete slab, prevents moisture from rotting the base and provides a clear architectural border between the structure and the lawn.
Irrigation planning is perhaps the most overlooked aspect of sauna integration. You must ensure that automatic sprinkler heads are not spraying directly onto the cedar or thermally modified wood of the sauna. This results in staining, wood rot, and internal moisture issues over time. We recommend a 3-foot buffer zone of non-organic material, such as river rock or crushed slate, around the perimeter of the sauna. This “drip line” captures rainwater shedding from the roof and prevents soil splash-back from dirtying the exterior walls. Walkways should be constructed from non-porous materials like flamed granite or textured porcelain pavers, which provide excellent grip when wet and do not track mud into the interior of the sauna.
Plant and Material Selection
The following table identifies ideal species and materials for creating a lush, private, and maintenance-friendly environment around your outdoor sauna.
| Plant Type | Sun Exposure | Soil Needs | Water Demand | Growth Speed | Maintenance Level |
| :— | :— | :— | :— | :— | :— |
| Thuja occidentalis (Emerald Green) | Full Sun | Well-drained | Moderate | Medium | Low |
| Buxus microphylla (Boxwood) | Full to Part Sun | Loamy/Acidic | Moderate | Slow | Medium (Trimming) |
| Miscanthus sinensis (Maiden Grass) | Full Sun | Adaptable | Low | Fast | Low |
| Hydrangea paniculata | Part Shade | Rich/Moist | High | Medium | Medium |
| Taxus baccata (English Yew) | Full Shade to Sun | Well-drained | Moderate | Slow | Low |
| Lavandula angustifolia (Lavender) | Full Sun | Sandy/Dry | Very Low | Medium | Low |
For hardscaping, we prioritize materials that handle heat and moisture without cracking. Polymeric sand is essential for filling the joints between pavers to prevent weed growth and stabilize the surface against the vibrations of a sauna’s mechanical components. Using a high quality geotextile fabric beneath your base material is also mandatory to prevent the heavy structure from sinking into the subsoil over time.
Implementation Strategy
The first step in any layout planning is a comprehensive site analysis. You must identify the lowest point of the yard to ensure the sauna is not placed in a drainage basin. Once the site is selected, the area should be excavated to a depth of at least 8 inches to allow for a proper sub-base. Start by laying down 4 inches of crushed limestone (3/4-inch minus), which should be compacted using a plate compactor until it is rock hard. This provides the structural stability needed for a heavy unit, especially those with glass fronts or heavy heaters.
Following the base preparation, install your utility conduits for electricity and water if you are including an outdoor shower. These pipes should be buried below the frost line, which varies by region but is typically 24 to 36 inches deep. After the utilities are set, lay the final layer of leveling sand or fine gravel. For the edging, use heavy duty steel edging or paver restraints to keep the hardscaping from migrating. Once the sauna is in place, apply a 3-inch layer of hardwood mulch or decorative stone around the surrounding planting beds. This mulch helps regulate soil temperature and moisture for your new plants while providing a finished, professional aesthetic.
Common Landscaping Failures
The most frequent mistake we see is insufficient drainage. If water pools around the base of an outdoor sauna, the wood will wick moisture upward, leading to mold and structural failure. A French drain consisting of a perforated pipe buried in a trench of clean gravel is often necessary to redirect water away from the sauna site. Another common failure is improper plant spacing. While a row of Leyland Cypress looks great for privacy at the time of installation, these trees grow rapidly and have aggressive root systems that can uplift the sauna foundation or invade utility lines within five years.
Soil compaction is another silent killer of garden health. During the construction of the sauna base, heavy machinery often packs down the surrounding dirt, making it impossible for air and water to reach plant roots. To mitigate this, we recommend core aeration of the lawn and the addition of compost to planting beds after the heavy lifting is finished. Finally, failing to consider the “thermal shadow” can be an issue. If the sauna is placed too close to sensitive broadleaf evergreens, the heat radiating from the exterior or the steam venting from the door can scorch the leaves, leading to unsightly brown patches.
Seasonal Maintenance
In the spring, focus on the integrity of the foundation. Check for any settling or shifting that may have occurred during the winter freeze-thaw cycle. Re-level any flagstone or pavers that have heaved. This is also the time to apply a fresh layer of bark mulch to the surrounding beds to suppress weeds and retain moisture for the coming heat. Summer maintenance revolves around irrigation. Monitor your plants to ensure they are getting enough water, especially those located near the sauna which may experience higher local temperatures. Trim back any branches of shrubs or ornamental trees that have grown within 12 inches of the sauna walls to ensure proper airflow and prevent scratching.
When autumn arrives, the primary task is leaf management. Debris that collects on the roof or around the base of the sauna can trap moisture and cause rot. Use a leaf blower or a soft-bristled brush to clear the roof and the drip line regularly. In the winter, snow management becomes the priority. Never allow heavy snow to accumulate against the side of the sauna, as the moisture can penetrate the wood during the melt. If you use salt or de-icing agents on your walkways, be extremely careful not to get these chemicals on the sauna wood or the roots of your native plants, as they can cause chemical burns and permanent damage.
Professional Landscaping FAQ
How far should a sauna be from the main house?
Ideally, place the sauna 10 to 30 feet from the house. This provides enough distance for a distinct “destination” feel while remaining close enough for easy access during winter and keeping electrical trenching costs manageable for the homeowner.
What is the best foundation for a garden sauna?
A compacted gravel bed or a reinforced concrete pad is best. These options provide superior drainage and weight distribution. Ensure the pad is at least 6 inches wider than the sauna footprint on all sides for stability and maintenance.
Can I put a sauna directly on the grass?
No, placing a sauna on grass leads to moisture entrapment and rot. The weight will also cause the structure to sink unevenly. Always use a stable base like crushed stone, decking, or concrete pavers to ensure longevity.
Which plants provide the best year-round privacy for saunas?
Evergreens like Thuja occidentalis or Taxus baccata are ideal. They maintain their foliage in winter, providing a consistent visual screen. Incorporate ornamental grasses for texture and movement, but keep them away from the heater vent to avoid fire hazards.
How do I manage runoff from the sauna roof?
Install a 3-foot perimeter of river rock or a French drain system. This prevents soil erosion and keeps the base of the sauna dry. In high rainfall areas, consider a small rain garden nearby to collect and filter the runoff.